Here is the Evaluation:

Friday, 4 March 2011


Thursday, 17 February 2011
The Final Cut!
Esser - Work It Out - Final Cut from Davide Hodgson - Lorente on Vimeo.
Here is the Final Cut to my music video!
Friday, 4 February 2011
DigiPak
Here is the Finished DigiPak!

I have tried to make all the products I have produced link together so that its reconisable for my audience. I have interlinked key images from my music video in both website and digipak.
1. Here I have recreated the hearts I designed for my music video to be the background of the where the discs go. I have made it so that there are two spaces for disc. One being the E.P. the other being the bonus features DVD which will feature behind the scenes material and other memorabilia.
2. These two panels are flaps that will house bonus material each side. As labeled on each, one will house the Lyrics and the other bonus material such as pictures in the studio, behind the scenes of the video and a promo shoot.
3. This is the last panel on the front that shows personal thanks from Ben Esser thanking his fans, studio and band. It also has the link to the band website at the bottom to hopefully direct more fans into the world of Esser. This is a very conventional approach to digipak production.
5. The Front cover is simple and bold. I wanted this as it sets the tone for the rest of the E.P. and overall the artist. The title is big clearly highlighting the Artist, its block colour with white writing is an impacting design and catches the attention easily.
I also incorporated this in the spine of the disc. This is a very important design factor as it is one of the appeals of digipaks over digital tracks. The appeal is that its tangible object and is memorabilia where as digital tracks are just pictures. The spine can be seen in a collection of CD’s and therefore appeals to the collector.
6. This was a design test when coming up with possible ideas for the Digipaks. After getting audience response they liked the “contrast with the other images but still maintaining its original design.” This then fitted perfectly as I really wanted something different to the white and blue design I have gone for. It’s another point where I have managed to incorporate the music video concepts to cross reference my work.
Here is a sample of how im going to put the lyrics in the flap.

Band Site
Here is the Band website!
All links are fully functional with flash widgets aswell.
http://esserband.com/
All links are fully functional with flash widgets aswell.
http://esserband.com/
First Cut
Work It Out.
Here is the (almost) finished product. It has everything but a couple shots.
Please ignore the grayish colour of the video as I think there has been a problem in either the export or upload.
Enjoy!
Here is the (almost) finished product. It has everything but a couple shots.
Please ignore the grayish colour of the video as I think there has been a problem in either the export or upload.
Enjoy!
Wednesday, 2 February 2011
Filming
Day 4.
This shoot was the unconventional shoot. This involved me going to the forest down the road and just filming a certain section of woods to be my background to the dinosaur sequence. As you can tell in the picture I am holding a set of images/storyboard that are screen grabs of the green screen images. This enabled me to tell what backgrounds I needed to film and from what angle. It

I blurred the images on Final Cut to make it look like video was actually filmed with the character on that particular back ground.


I think it worked really well actually, next time to make it look more authentic I should play with lighting so that the lighting on all 3 layers are the same. This would add the realistic look of the dinosaur, I would also need to learn about particles so that the scene was more realistic.
This shoot was the unconventional shoot. This involved me going to the forest down the road and just filming a certain section of woods to be my background to the dinosaur sequence. As you can tell in the picture I am holding a set of images/storyboard that are screen grabs of the green screen images. This enabled me to tell what backgrounds I needed to film and from what angle. It

I blurred the images on Final Cut to make it look like video was actually filmed with the character on that particular back ground.


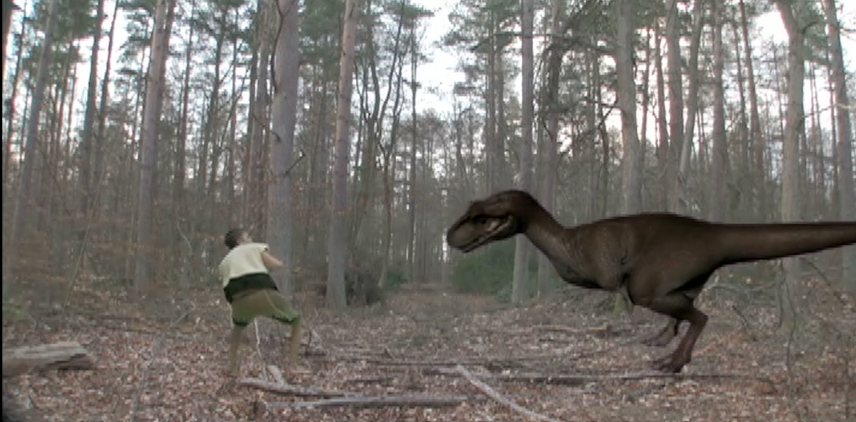


I think it worked really well actually, next time to make it look more authentic I should play with lighting so that the lighting on all 3 layers are the same. This would add the realistic look of the dinosaur, I would also need to learn about particles so that the scene was more realistic.
Tuesday, 1 February 2011
Filming
Day 3.
This shoot is the start and end of the music video. It took just over one hour to have completely filmed and in my opinion worked well. I had three actors with me (four including the cameo from me).
I filmed it in my local town down a side street which is fairly quiet. I decided on doing it down this alley as it was pretty generic and couldn't be directly associated with Bury. I filmed the first 10 seconds of the music video straight away and from there it was a pretty quick shoot. The only problem was that it was absolutely freezing other than this, the shoot went well.
The flowers were a last minuet prop I added because I thought It would be a nice touch and It gave the audience more to look at rather than a guy looking around. It also created the perfect opportunity for some slap-stick comedy when he gets hit with them.

Filming
Day 2.
The second day of filming involved just me and my main actor Jamie for the green screen.
I spent the morning ironing the green screen to get rid of any big creases this certainly helped as the test before were terrible in comparison.
I made several changes, I only used 2 lights on the green screen and 1 photography light on Jamie so he didn't have a Matt texture to him.
Another factor which improved the green screen this time round was the clamps. Originally I only used four, this time I used 8 plus lots of gaffer tape all along the sides to keep the screen taught and crease free.
I apologise that I don't have many pictures of the green screen as I was rushed for time as I only had one hundred minuets to set up and shoot everything I wanted.
It was a great learning experience as at first it seemed a bit weird to have my actors acting to nothing and not having to move the camera. The positioning the actor in different places to compensate for the lack of movement available from the camera was also a interesting way to film.
The shoot worked out well and happened just within the 100 minuets given to me. It was a great learning curve and I defiantly want to advance this skill further.

Filming
Day 1 Filming.
First day of filming is the Happy world. The shoot started at 5.00pm and ended at 12.00am. It took a while as the setting up took time and I had several technical problems with the projector. I filmed the heart scenes within the first two hours and the rest was mastering how to operate the time machine.
Day 1 filming was the first time all my actors saw what I actually described to them, they described it as surreal, this is a massive compliment as its exactly what I was trying to achieve.
The set was a plain white room which I had built the time machine in, (which is mentioned in post below) I had light bouncing off the ceiling while using a straw Gel. This indirect light with the gel created warmer colours in the room as it seemed to clinical being all white.
I had a sound system set up so that my actors could clearly hear what they were dancing and singing to. This really helped when syncing the sequences in final cut as it was clear on the camera.
Just below the camera two fans were set-up so that the balloons could be released on top of them and they would create a hovering effect instead of a falling movement. (This picture was the tester when I only used one fan)

I talked my actors through what I wanted in each sequence. With the hearts I showed them what I wanted to achieve at the start of them coming into shot and then after that I gave them autonomy as the hearts are both A-level Dance students - much better than me! They experimented with the movements of the hearts and came up with some really great stuff, its a real shame I had to cut it out.
I asked both the dancers to wear white from at least the waste down as then when the heart moves they will kind of blend in with the background. However this is postmodern and I want the audience to be aware of its constructed nature.
To keep my team of actors motivated I offered Pizza as an incentive to stay as it was a long shoot. I am extremely grateful for all their hard work and time because if it wasn't for them Day 1 filming wouldn't have happened.
Friday, 28 January 2011
Auidence Response
Since I have almost completly filmed and edited my music video I have decided to show a few people who would be in my target audience what they think to the video.
Below are some writtern comments from differents individuals:
Criticism
"It doesnt make sense" - (only one person had this issue)
"The change in lighting bothers me"
Issues with swapping form wet to dry
The CGI is unrealistic
The beating at the end is unconvincing
The CGI work is jumpy
Could use some conventional time travel ideas?
The genre of the video is undefined - cant tell if its cheesy or not
The "birthmark" on the right heart - Ruins the symetry.
Praise
Hit in the face with flowers
"The feather duster is genious!"
"The climbing through the bed sequence is awesome!"
"The emotional bit with the projection is really good"
Sequence where main character looks back on himself is very clever
Ending is fun and clever
Really good acting from Jamie
Lipsinking has been done well and theres not too much singing
The dinosaur is so cool!!
Tuesday, 11 January 2011
Myspace
I posted on Essers official myspace page to ask for permission to use the track 'Work It Out'


As of yet, I have not heard back...
Test Shots
First Underwater Tests.
After developing my underwater housing for my camera here is the first underwater test. I improvised with a rubber glove over the end of the camera housing creating a tight seal.
Here it is, please excuse the lack of quality, the camera is struggling to focus through the dirty perspex as I should have cleaned it before.
New Ideas
Memories Projection.
I had a new idea recently to have my actor up against a wall while he is singing and having his memories projected on top of him. I think its an interesting way to show the memories instead of physically presenting them to the audience. I expect the audience to make the jump that these are the characters memories on their own. I don't want to spoon feed my audience as my target audience will have a negotiated reading on what they consume.
The video below is about 40 seconds of footage looped for 5 minuets. It shows random shots of an event with him and his girlfriend, its in a jumbled order enforcing the old nature and patterns of his thoughts.
I used a sepia filters as well as an 'bad TV' generator which created the scrolling image.
(Warning: Fast moving images. Possible threats of insanity if watched for too long)
Re-filming
Bed Shot '2
Below is an extract from my music video of which I have re-filmed.
The first time I attempted this shot I had problems with matching the two layered images due to the fact of movement and lighting. However in this re-shoot I have addressed these problems and it has created a smooth image which has disguised the method I have used.
Wednesday, 29 December 2010
CGI - Continued
Following on from my last blog I have been researching further articles and have been discovering new techniques which can relate to my project.
The mouth can now be animated along with the eye lids and nostrils.
I have been doing some work on animating the mouth and tongue. Coinciding with this I have been watching Jurassic park to see the movements of the dinosaur.
In this video you can see the mouth, tongue, eyes, and legs have been animated.
I've been researching the movements of frogs particularly how the legs move in the air.
My aim is that the dinosaur will attack my character, by hitting him with a club then continue time travelling.
Below are a couple pictures to show what the render of the dinosaur will look like once complete. Its the same frame just at different angles.


The mouth can now be animated along with the eye lids and nostrils.
I have been doing some work on animating the mouth and tongue. Coinciding with this I have been watching Jurassic park to see the movements of the dinosaur.
I've been researching the movements of frogs particularly how the legs move in the air.
My aim is that the dinosaur will attack my character, by hitting him with a club then continue time travelling.
Below are a couple pictures to show what the render of the dinosaur will look like once complete. Its the same frame just at different angles.


Sunday, 26 December 2010
CGI
I have taken my dinosaur animation one step further after finding some new software.
I am currently using Maya. This programme was used to make films such as; Spider-Man, Star Wars, The Lord of the Rings: Trilogy, Gladiator, The Matrix I , II & III, The Hulk, Terminator and Monsters Inc.
And the list goes on!
I have taken on the daunting task of trying to teach myself how to use this programme. In addition to this I read well over 20 articles, watched countless tutorials and spent many hours trying to learn how to use the programme.
I am currently using CGI for the fight between my character and the dinosaur. Originally I bought a toy dinosaur with the intention of using in this scene using stop-animation. However I changed my mind when the opportunity to use CGI came along as I found it more of a challenge.
Here is the dinosaur I am currently working on:

When animating the dinosaur it works very similar to stop-animation. You move each joint however you intend it to be and then set a key frame - the equivalent to taking a picture. However the difference with this is you can jump 50 frames (or more / or less) ahead and choose the position you want the dinosaur to end in and set a key frame. The computer will then do the rest in between the two key frames therefore cutting time.
The most time consuming part of this is the programming of the character. I luckily found a plug-in and only had to create a couple joints, renders and features.
I am now animating the dinosaur, I have constructed 15 seconds(Aprox.) of film and I aim to make this to about 20 - 30 seconds long.
Here is what I have so far:
Tuesday, 14 December 2010
Green Screen
Green Screen Prep.
Here are some pictures of me and the other group I am working with preparing the green screen for when we do our shoot.
We decided that we would iron the whole green screen as it would help in the post-production process so that the key can be clearer.

 I decided it would be a good idea to use a large piece of cardboard to use as a guide when folding the massive piece of fabric as it would cause less creases. I trimmed the cardboard so that it was half the width of the fabric so that it could be doubled over making it compact resulting by having less creases compared to if it was more compact.

Here are some pictures of me and the other group I am working with preparing the green screen for when we do our shoot.
We decided that we would iron the whole green screen as it would help in the post-production process so that the key can be clearer.


Sunday, 12 December 2010
Set Design + Prop Design
The Time Machine.
The Time Machine is my characters way of escaping his problems of being love sick. He can travel in and around time but I like the idea that he can't properly use this "hi-tech" piece of time travel equipment.
I designed it to have lots of different buttons, lights and faders. Considering the music is electronic and has lots of synthesized sounds I thought it would be appropriate to use real music equipment. An example of this is a sound mixing desk which will act as the control panel. In addition to this I have a small toy keyboard which I might incorporate.
Here is what I have so far:
I started with lots of scrap cardboard and bits and pieces.
 This is the time machine in its current state. I like the lampshade, it gives it the homely feel. Almost Wallace and Gromit like.
 As you can see it has flashing L.E.Ds along the front of it, This has a really good effect with the tin foil.
I also had the luck of a friend having a backwards clock!
 I have made it all from scrap cardboard and Tesco Value tin foil. All the items used in this time machine have been borrowed or found by rummaging through the church I am filming at.
 The feather duster launches it through time and space. (AKA the throttle)
The guitar pedal is the foot pedal, not sure what it does yet, but maybe it could be in conjunction with the music?
As you can see the time machine is not complete due to lack of colour. The room is completely white and the tinfoil just reflects the colour. Below are two other pieces which I will add to it:
THE FLUX CAPACITOR!! - Thought this would be an interesting piece of inter-textual referencing.
At the moment its just a box with tin foil...I am going to get 3 blue glow sticks and fix them in the Y position. Hopefully this will make the time travel possible :)

The Time Machine is my characters way of escaping his problems of being love sick. He can travel in and around time but I like the idea that he can't properly use this "hi-tech" piece of time travel equipment.
I designed it to have lots of different buttons, lights and faders. Considering the music is electronic and has lots of synthesized sounds I thought it would be appropriate to use real music equipment. An example of this is a sound mixing desk which will act as the control panel. In addition to this I have a small toy keyboard which I might incorporate.
Here is what I have so far:
I started with lots of scrap cardboard and bits and pieces.


I also had the luck of a friend having a backwards clock!


The guitar pedal is the foot pedal, not sure what it does yet, but maybe it could be in conjunction with the music?
As you can see the time machine is not complete due to lack of colour. The room is completely white and the tinfoil just reflects the colour. Below are two other pieces which I will add to it:
THE FLUX CAPACITOR!! - Thought this would be an interesting piece of inter-textual referencing.
At the moment its just a box with tin foil...I am going to get 3 blue glow sticks and fix them in the Y position. Hopefully this will make the time travel possible :)

This here is the Bubble Dynamo Vim (BDV) - Basically it will bubble when time travel starts. It builds up energy and releases it at an incredible speed launching the time machine and the operator in to worm hole's to eventually end in the destination.
Its a bit like fuel though...so it runs out.

I decided to make this as I wanted more movement on my time machine and I also wanted more colour. It has a fun effect which I really like.
I also covered up the window in the back ground by using a huge sheet of white paper just so that it made the room bigger and didn't retract form the time machine. I think it works well as you can't tell by looking on the camera it isn't a wall.


I also covered up the window in the back ground by using a huge sheet of white paper just so that it made the room bigger and didn't retract form the time machine. I think it works well as you can't tell by looking on the camera it isn't a wall.


Set Design - Bedroom
This scene is were the character disappears into the bed into his happy world.
I am going to re-film this section as I quite stupidly changed the lighting...
Anyway I will show you what I have got so far and how I did it.
I have the character sitting on the bed, he then opens up the sheets and travels through his bed but doesn't come out the other side.
For this I had to keep the camera in the same place when I filmed from this angle to make sure it worked.
First of all I filmed the character climbing through the bed.
For this I had to take off my mattress, unscrew a few panels and stuff the bed frame to replicate the mattress. I then placed a cheap bed sheet over the top and cut a slit in it so that my actor could slip through.
 If you watch you can see a clear line across clearly showing that its shot at different times...This is due to me changing the lighting.
Here is what I have so far:
(The aspect ratio is a tad strange and its only 38 secs long)
I am going to re-film this section as I quite stupidly changed the lighting...
Anyway I will show you what I have got so far and how I did it.
I have the character sitting on the bed, he then opens up the sheets and travels through his bed but doesn't come out the other side.
For this I had to keep the camera in the same place when I filmed from this angle to make sure it worked.
First of all I filmed the character climbing through the bed.
For this I had to take off my mattress, unscrew a few panels and stuff the bed frame to replicate the mattress. I then placed a cheap bed sheet over the top and cut a slit in it so that my actor could slip through.


Once I had filmed my actor climbing through the bed I simply filmed the bed and nothing happening.
So in post the first video layer was that of my actor climbing through the bed. Then I layered the second video of nothing happening on top. I cropped this video from the top only showing the bottom half of the bed.
This then created the effect of my actor slipping through his bed in to nowhere.
Here is what I have so far:
(The aspect ratio is a tad strange and its only 38 secs long)
Prop Design - Dancing Hearts
For my happy world I want to have lots of fun colourful items in the room. Iv decided as the character is feeling love sick that I wanted to emphasis on this.
So for my little dancers in the background I want them to wear big colourful smiley hearts.
I have made them out of cardboard which I have found in the recycling skip at school.
Here is what I made at school. I first of all made one full size half. I then continued to use scraps of cardboard to draw and cut around.

I then painted them red.

Then I painted smiley faces on them.
(YET TO BE UPLOADED)
Subscribe to:
Posts (Atom)